
Finally! A new DIY project! It's one that I am pretty excited about, not only for its simplicity but for how well it turned out. I have been looking for new nightstands for what seems like forever. I didn't want nightstands that looked too dinky and with no storage so I originally thought I would try and find two dressers on Craigslist and refinish them, but then I was stuck with the dilemma that I wanted them to look the same. Luckily then I came across this blog...aubreyandlindsay.blogspot.com
She took a RAST bookcase from Ikea and made it into this (wish my photos looked as beautiful as hers!)
First thing first, go to Ikea and purchase the nightstand for $34.99 (can't beat that!) and assemble the RAST nightstand...

Mitsy doesn't seem happy with this process!

Next I look the drawers outside and primed them. I like to use a foam roller for both the primer and the paint - it gives it an ultra smooth finish with no brush strokes.

BM Fresh Start Enamel Underbody in White - I used this on my kitchen cabinets as well - It's oiled based so make sure you are well ventilated
 |
| PRIMER |
I did one thin coat of primer as you can see above, next time I might do two thin coats instead to cover the wood grain more.

Then I did three thin coats of the same white BM Advantage paint I used for my kitchen cabinets
 |
| 1ST COAT OF STAIN |
Next I moved onto the nightstand itself. I used Minwax dark walnut. Just spread it on with a cloth in the direction of the wood grain. Then go back in about 5 minutes and go over it with a clean cloth to remove any extra that didn't absorb.
 |
| 2ND COAT OF STAIN |
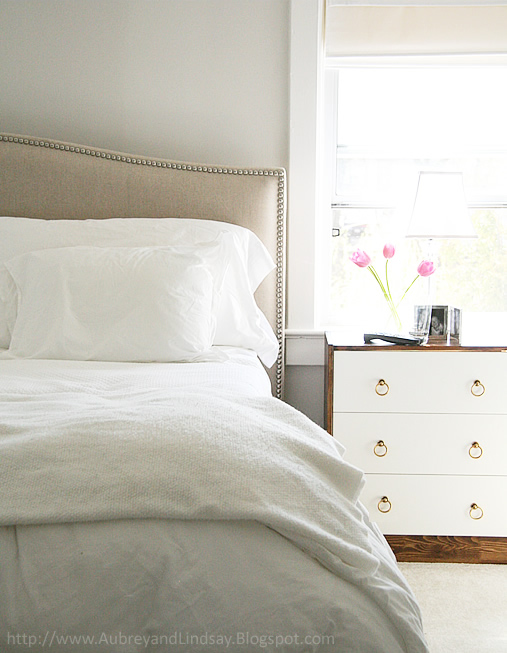
Last step was to use a polyurethane in clear satin over the stain. And after everything dried I had this....
 |
| AFTER |
I added some Martha Stewart hardware for the time being until I find something better. I still have one more to do for the other side of the bed. I am pretty happy how it turned out! Just wish I could take magazine quality pics haha! Here are some more AFTERs below...
 |
| AFTER |
 |
| AFTER |
 |
| AFTER |
What;s next up for the bedroom you ask?
2nd RAST nightstand
New wall color
New tufted headboard
We be so grateful for some pins!

Is that the IKEA Leirvik bed?? I have these side tables already and am looking at getting the Leirvik, so I'd love to see what they look like together!
ReplyDeleteHey Ali!
DeleteYeah it is the IKEA Leirvik, but we actually no longer have it, as we replaced it with a tufted headboard I made. But it did look great with our nightstands at the time! Thanks for taking the time to check out my blog!
I'm in the process of completing this project, very similar to yours (same inspiration!) Just wondering how long you let the varnish cure before you placed stuff on it - we have very heavy crystal lamps that will be going on top of them, and I won't want the varnish to stick.
ReplyDeleteHi Daniela!
DeleteThanks so much for stopping by! I think I waited about 24 hours before I put them up in the bedroom. There are water based varnishes as well, not sure if they dry faster or not.
hope that helps!
Perfect, thanks!
DeleteHi I love the color, and I was thinking of using it for my rv remodeling. But could you maybe tell me the exact name of the products you used, so I can try to find them online maybe since I live all the way in Iceland. And I might have to order online and I would hate to order the wrong thing since I can´t exactly go and return them. ;) Just need for the outer part, the dark color. I want to do a rustic country look in my old rv.
ReplyDeleteWe grow up listening that proper diet and exercise are very important to live a happy and healthy life. Seldom are we informed about the benefits of a right mattress and the harmful effects of sleeping on a bad mattress.
ReplyDeleteBuy Right Furniture
Watch all the latest pinoy replays in hd on pinoy tambayan and all the episodes shaare with you which you will be watch everytime.
ReplyDelete